Showing posts with label Pickles. Show all posts

Friday, August 23, 2013

Pale Ale Brined Eggs (Beer Pickled Eggs)


A hamburger and a french fry walk into a bar. The bartender says, "I'm sorry we don't serve food here.

Actually, that's pretty unlikely.  Most bars do have food available to the customers, in some form or another. Whether it be bowls of pretzels and nuts, or hot wings, or pickled eggs.

Bar food is usually inexpensive. It is often hot or salty or mouth puckery, and it is almost always some form of finger food.

Why?  Because they want  you to eat when you drink so that you don't get totally sh!t faced, so you can drink more.  And all that spicy, sour, salty food makes thirsty, so you will drink more.  And, if you're not distracted by cutlery like which fork to use for which whatever, you will drink more.

It's all about drinking more.  And I, for one, am all for that!

You may or may not have ever seen a big jar of pickled eggs sitting on the corner of a bar.  If you've been in a dive, you probably have.

Although, I've never eaten a pickled egg in a bar, I like them.  I just won't eat them if they're sitting there and I don't know how long they've been sitting there.

I've decided to bring the bar to the egg to make beer brined eggs. I must say they are surprisingly tasty and go great with a cold, frosty brew.


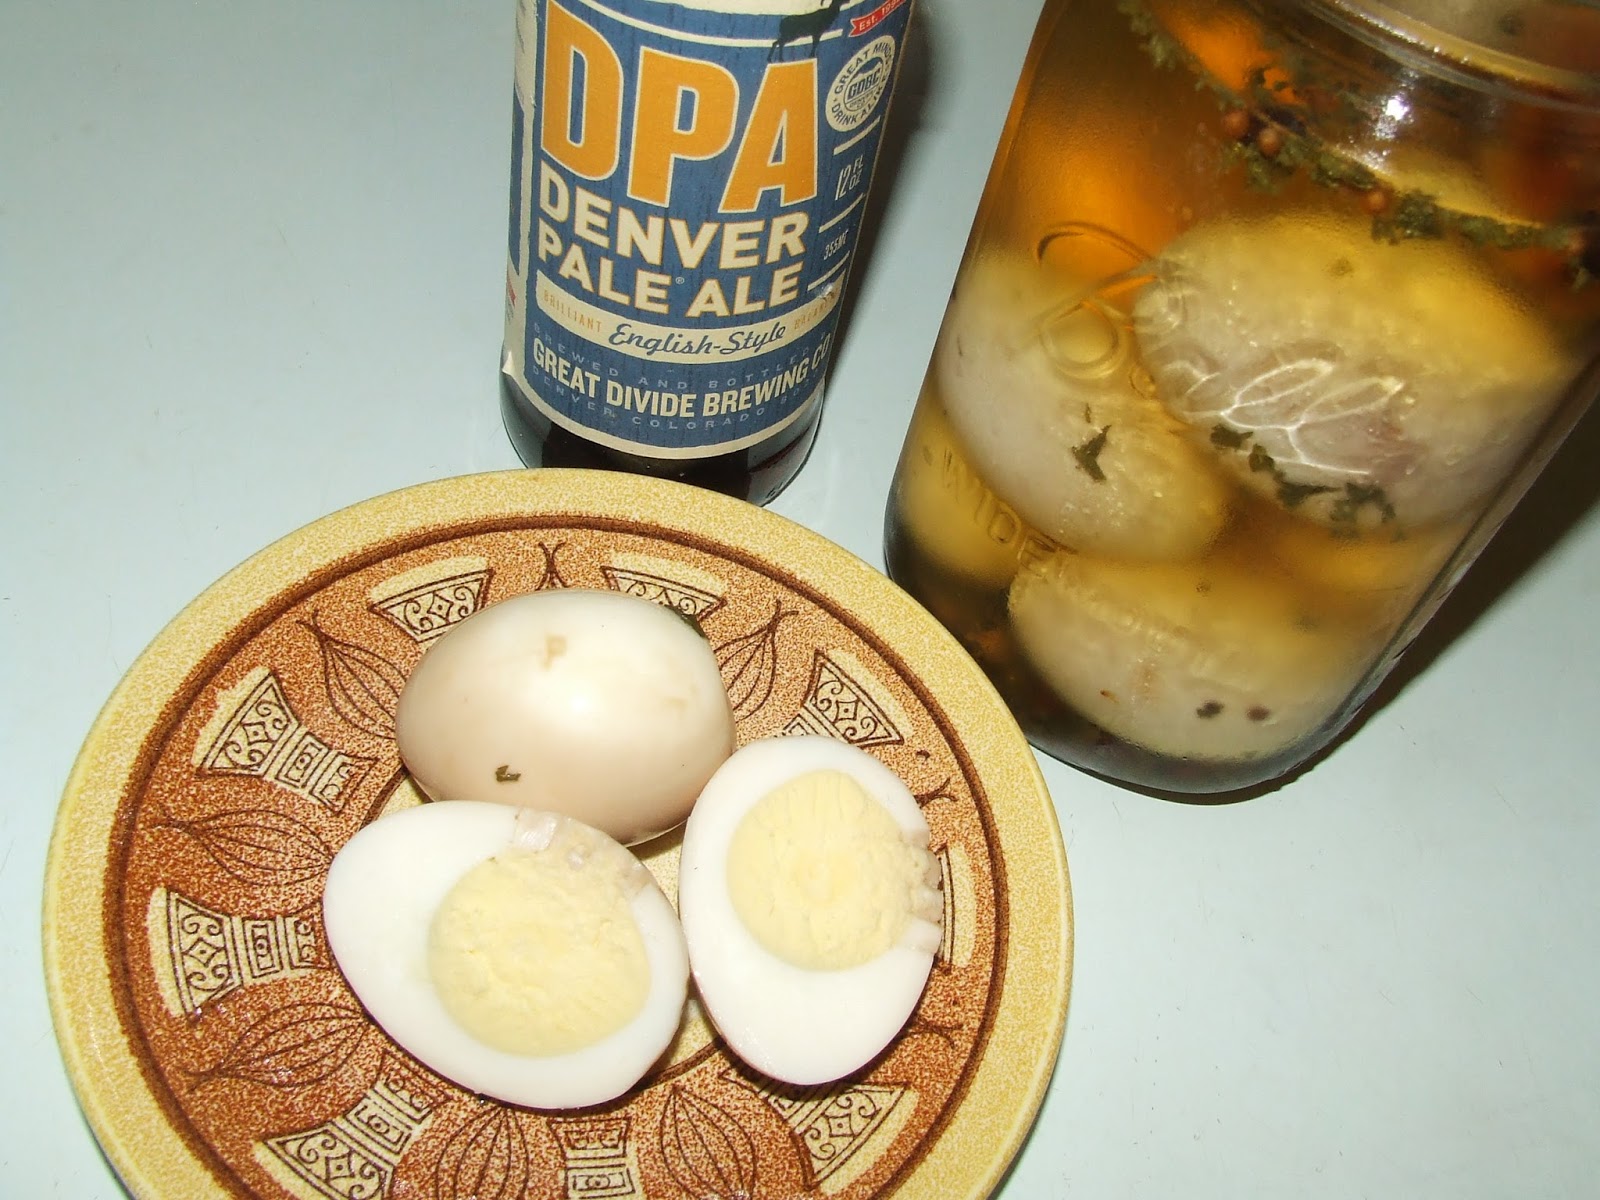
I used Denver Pale Ale, which is an English style pale ale, because it's a little sweeter and  not as bitter as American pale ales. Also, it's light in color.  I didn't want to use an intense flavored beer so to not overpower the eggs. Nor did I want to use a dark beer because it will discolor the

That being said, use whatever you like.  Pickles eggs made with an amber ale might be pretty; pretty tasty, too.


Pale Ale Brined Eggs (Beer Pickled Eggs)

24 Small Hard-Boiled Eggs
1 (12 Fluid Ounce) Bottle Beer
2 Cups Apple Cider Vinegar
2 Tbsp Pickling Spice
2 Tbsp Parsley Flakes
4 Tbsp Kosher Salt
2 Hot Peppers

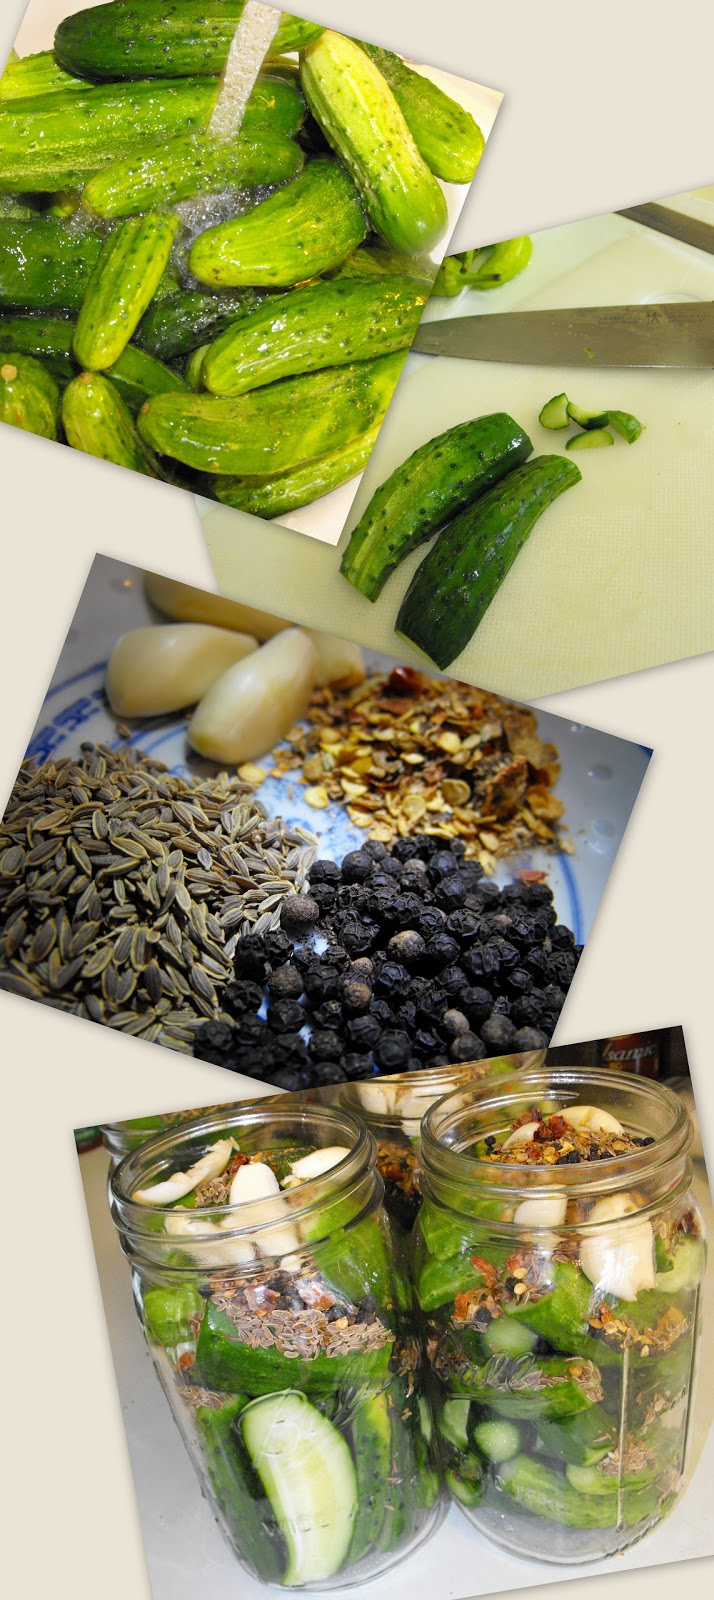
Place eggs in a large, deep pot and cover with cold water. Bring to a boil over high heat.  Turn down to a simmer and cook for 15 minutes.

Drain and place in fresh cold water.  When the eggs are cool peel. Stab each egg with fork so that all that tasty brine can fully penetrate the egg.

(She said fully penetrate! Yes, yes I did)

Divide the eggs into two quart sized canning jars ( or other air tight glass container).

In each jar place, 1 tablespoon each of the pickling spice and parsley flakes plus 2 tablespoons of kosher salt and a hot pepper.  Use whatever kind of pepper you like or omit the pepper if you don't want spicy eggs.  You can use the pepper whole or seeded or whatever you like depending on level of spiciness you like.

Combine the beer and vinegar and pour over eggs until they are fully submerged. Add additional vinegar if you need more liquid to cover the eggs.

Cover and refrigerate for at least 1 week before using.

Enjoy with your favorite beer or as a snack or even chopped up on a salad.

Thursday, July 25, 2013

Spicy Sweet And Sour Brown Ale Pickles


My hopped up IPA pickles were a big hit (see recipe).  That left me wanting experiment with a different style of pickle utilizing a different style of beer.  

I thought that a brown ale would go will in a sweet and sour pickle recipe because if the mild sweetness of the beer.  And, of course, I had to throw hot peppers into the mix.  Why not, right?

These pickles are gently sweet and a little tart with just the right bite of spicy goodness.  

I did good!

I used Six Point Brownstone Ale, but you can use any brown ale you like.  

Spicy Sweet And Sour Brown Ale Pickles
Refrigerator Pickles

Makes 4 Quarts 

20-24 Small Pickling Cucumbers
1 Small Onion, Sliced Thin
2 Stalks Celery, Cut In Half
4 Hot Peppers, Halved
4 Cups Raw Sugar
1/2 Cup Pickling Salt
1 Quart Vinegar
1 16-ounce Can Sixpoint Brownstone Ale

Cut off the ends of cucumbers.  This is important because there are enzymes in the ends that will soften the pickles . . . i.e. less crispy. 

Cut the cucumbers into quarters, make sure they’re short enough to fit in quart mason jars without sticking up too high.  Pack the cucumbers into the jars.  (Note: I used a half gallon canning jar with swing top and gasket)

Add 2-3 onion slices, half a celery stalk and one hot pepper to each jar.

In a large saucepan, dissolve sugar and salt in vinegar and beer.  Bring to just boiling.  Be careful the syrup doesn't boil over.

Using a ladle, pour the hot liquid over the cucumbers leaving about a 1/4 inch of headspace.

Screw the lid tops on and allow the jars to cool on the countertop.

Put the jars in the fridge and allow the pickles to absorb all the wonderful spices.

After about a week open the jar, take a bite and be completely impressed with your awesome pickling skills! The longer they sit the better they will get. 


Saturday, October 27, 2012

Zucchini Pickles


My hubby loves pickles.  This season I had a bumper crop of cucumbers and I tried several different methods . . . natural fermentation, beer pickles, refrigerator pickles, kosher dills, garlic dills, etc.

I also had an amazing crop of zucchini.  I wanted to preserve some using a method other than drying or freezing them.

Zucchini takes on the flavors of seasoning very well, so I thought to myself, why not try making zucchini pickles.  I made a small batch to see if they would get hubby's approval.  They've been sitting a couple months and I finally busted into a jar and put them in with his lunch without any warning about what he was getting . . . he gets pickles everyday so he was expecting to have them.

Lunch passed with no comment from him so I asked.  He said he didn't notice a difference . . . they tasted like pickles.

Zucchini pickles passed muster!  And zucchini are so easy to grow that I'm thinking they'll be a suitable pickle substitute should a cucumber crop be less than expected.


I made them using my standard dill pickle recipe using a "low temperature process" method . . . the jars stay in the water bath at a lower temperature for a longer time which is supposed to keep the pickles crunchier.

Make sure you use fresh, crisp zucchini.  Don’t can soft or overripe vegetables or you will end up with soft, limp pickles.   Small, firm fruit with dark skin are better than the gigantic zucchini that are preferable for stuffing.

You’ll need a Quick Process Pickling mix . . .  I use Mrs. Wages Kosher Dill  . . . and clear vinegar.

I generally can pickles in pint jars . . . I prefer wide mouth, but that’s up to you.

Wash the zucchini in cold water.  Then cut them into spears.  Makes sure the pickles are a length that leaves at least a half an inch of head space in the jar.

Before you pack the jars you will need to make sure the jars are clean and sanitized.  If you’re dishwasher has a high temperature wash then that is sufficient.  If not submerge the jars in a large pot of water . . . I use my canning pot . . .  and bring it to a boil.  Put the lids in another pot and boil them for several minutes and leave them in the hot water.

Fill the canner about 1/2 full of water and start it heating (with the lid on).

Follow the directions on the pickle mix . . . basically combine the mix with vinegar (and water if the recipe calls for it).  Bring to a near boil.

Add the zucchini spears and simmer for 3 minutes.  Then pack the zucchini into the jars and pour the simmering pickle mix liquid over them. Fill them to within ¼-inch of the top, seat the lid and hand-tighten the ring around them.   You can add a clove of garlic and a sliced jalapeno for extra spice.

The zucchini tend to float in the liquid that's why it's important not to over fill the jars.  Make sure you wipe the lip of the jar and push them down and seal with the ring.

Put them in the canner and keep them covered with at least 1 inch of water. Keep the water boiling until you are ready to process. Then, here's the key to crisp pickles: pickles should be processed for at 180-185°F, which is obviously below boiling (212 F), but hot enough to kill bacteria.


Check with a thermometer to be certain that the water temperature remains above 180° during the entire processing time. But keep the temperature below 185° to avoid breaking down the pectin.

Process them for 30 minutes.

Then carefully remove the jars from the water and allow them to cool in a draft-free area.  I know it’s tempting but don’t touch the jars while they’re cooling and try not to bump or jostle them.  Just let them sit quietly.

After 24 hours you can remove the rings and make sure your jars have sealed.  But any jars where the lid hasn’t sucked down into the fridge and eat them first.  You can check by pressing your finger into the center of the lid . . . if it pops then it’s not properly sealed.

You can eat the pickles anytime but they’re better if you wait at least 2 weeks.  It’s torture but it’s worth it!


Saturday, October 20, 2012

Hot Pickled Green Beans


Pickling is an easy way to preserve your garden vegetables.  

I got loads of green beans and hot peppers from my garden this year and wanted to do something different with them . . . so I decided to put them both together in a jar and pickle them.

This is an easy recipe for pickling green beans with a kick.  It will make 10 pints of hot pickled green beans!  

Hot Pickled Green Beans

4 Pounds Green Beans
10 12 Ounce Canning Jars With Rings and New Lids
10 T Garlic, Peeled and Minced
10 Small Fresh Hot Cherry Peppers or Jalapenos 
Peppercorns
Pickling Brine 

Pickling Brine: 
6 Cups Water
4 1/2 Cups Cider Vinegar
6 Tablespoons Pickling Salt


Start by sterilizing the jars and lids. Bring the water to a boil to sterilize the jars while you prepare the rest of your ingredients.  Boil the jars at least 5 minutes. Add the lids to a smaller pan of water and bring to a to boil.  Turn down to a simmer once the water has come to a boil. 

Make the pickling brine by mixing all ingredients together and bring to a boil.  Keep at a simmer until ready to use.

Wash the green beans and peppers.  Snap the ends off the green beans.  You can leave the little "tail" on the other end of the green beans.

Trim the beans so that they fit in your jar. If you have very long beans, like I do, you may have to cut them in half.  Pack them in tight to minimize air space.

Add 1 Tablespoon of minced garlic and 1 tablespoon peppercorns to each jar and top with a pepper.  If it’s a small pepper use the whole pepper.

Fill each jar with hot pickling brine, leaving 1/2 inch of head space.

Use a plastic knife to remove air bubbles from jar by running it around the interior of the jar. Wipe the rims and apply the lids and rings.

Place the jars of beans into the canning pot.  Make sure the jars are covered with at least an inch of water.  Bring the water to a full boil.  Process the beans for 10 minutes in a boiling water bath.

Remove the jars from the pot and let them sit undisturbed for at least 12 hours.  At which time you may remove the rings and store them.

Test to make sure the jars are sealed by pressing down on the middle of the lid.  If isn't sucked down then put the jar in the fridge and use as soon as possible. 

Let the beans sit for at least two weeks before eating, to thoroughly develop their flavor.

Chill before using for maximum crunch.


Saturday, September 22, 2012

Naturally Fermented Dill Pickles


There is a little bakery (Vintage Baking Co.) in Glen NH that sells the most amazing bread.  They also have available a wonderful selection of cheese, wine, and other things to compliment said bread.  One thing they almost always have are jars of the most delicious pickles; they aren’t cheap but we always get at least one jar when we visit.

These pickles aren’t anything like the ones you get at the grocery store.  These are naturally fermented pickles  . . . i.e. lacto-fermented pickles.  And they are as close to a perfect pickle as I’ve ever tasted.

Lacto-fermentation is an ancient form of preserving foods . . . think sauerkraut, kim-chi, and yes . . . pickles (among many other things). 

All you need is salt, water, spices and the naturally occurring yeast spores floating around in the air.

So, I wanted to learn how to make these mouth watering wonders.  And I did!  This is how . . .

Naturally Fermented Dill Pickles
(Lacto-Fermented Pickles)

6-8 small (3-4 inches long) un-waxed cucumbers. I used pickles fresh from my garden but you can find pickling or “Kirby” cucumbers in your grocery store that will work just as well.
1 1/2 cups filtered water
2 tablespoons sea, kosher or any salt without additives
4 - 8 sprigs of fresh dill
2 cloves of garlic, peeled and crushed
1 Tablespoon peppercorns
1 Tablespoon Mustard seeds
1 -2 Grape, Oak or Cherry Leaves

This recipe makes 1 quart sized canning jar of pickles.  I made more than that by multiplying the ingredients accordingly.

Sterilize your jar or jars in boiling water and allow to dry.

Combine salt and water in a saucepan.  Heat on stove, stirring until salt dissolves then cool.

After washing cucumbers, cut the tips off on both ends.  It is especially important to remove the blossom end as the blossom contains enzymes that will soften your pickles.  You can leave the cucumbers whole or cut them depending on how you like your pickles.

Arrange a washed grape leaf (oak or cherry) on the bottom of the jar.  Why the leaf?  Because the tannins found in these leaves inhibit the enzymes that cause the cucumber to soften . . . thus crunchier pickles!

On top of the leaf place sprigs of dill.

Without crushing them, tightly pack the cucumbers in the jar. Add remaining dill, garlic cloves, mustard seeds and peppercorns.  I cut a cucumber in half and pushed it under the curved top of the jar to keep the other cucumbers submerged in the brine.  You can also top with an additional grape leaf.

Another method is to place a boiled stone on top to keep your pickles from floating up above the water when the pickling process causes them to shrink.

Pour the salt water into the jar; completely covering the cucumbers.

Cover the top of the jar with cheese cloth or similar to allow the yeast spores to enter the jar that aid in fermentation.  I use an ankle stocking and slip it over the top . . . its elastic so it stays in place.

Let the jar sit undisturbed at room temperature. In a few days you will notice the brine start to get cloudy and bubbles will begin to form.  You may also notice a thin white layer forming . . . this is natural.

The fermentation will take from three to ten days.  Mine took ten days, but I was using a ½ gallon jar.  Start sampling around three days.  When they taste the way you like them then put a lid on them and place them in the fridge.  They will continue to ferment but at a slower rate.  After a month in the fridge they tasted very close to the pickles we were paying a premium for at the bakery.

Pickles will keep for several months in the refrigerator.  Just be sure to keep them submerged in the brine.

These pickles are perfect for a Dill Thrill!


Tuesday, August 21, 2012

Sea Hag Hopped Up Pickles (Spicy IPA Pickles)


Sea Hag Hopped Up Pickles
(Spicy IPA Pickles)

2 Pounds Small Cucumbers
1 1/2 Cups Apple Cider Vinegar
1 Can Sea Hag IPA (or any good IPA)
2 Tablespoons Pickling Salt OR
3 Tablespoons Kosher Salt
8 Garlic Cloves, Peeled
4 Teaspoons Dill Seed
2 Teaspoons Black Peppercorns
1 Teaspoon Red Chili Flakes

Cut off the ends of cucumbers.  This is important because there are enzymes in the ends that will soften the pickles . . . i.e. less crispy. 


Cut the cucumbers into quarters, make sure they’re short enough to fit in quart mason jars without sticking up too high.  Pack the cucumbers into the jars

Split the rest of the ingredients between the two jars.

Combine the vinegar, beer, and salt together in a saucepan, heat until just boiled.  Be careful because it will boil over.

Using a ladle, pour the hot liquid over the cucumbers leaving about a 1/4 inch of headspace.

Screw the lid tops on and allow the jars to cool on the countertop.


Shake the jars gently to mix the spices around.  Put them in the fridge and allow the pickles to absorb all the wonderful spices.

After about a week open the jar, take a bite and be completely impressed with your awesome pickling skills!

PS . . . I use New England Brewery Sea Hag cuz it's a rockin' good beer that make seriously rockin' good pickles!


Saturday, July 14, 2012

Canning your own food is very rewarding, saves money and the taste is so much better


My husband is a pickle fanatic . . . he has to have a pickle everyday with his lunch and if I happen to forget to put one in his lunch box I hear ALL about it.  And when we go out to eat, I have to protect my pickle from his pickle swiping fingers.

So, last year we grew cucumbers in our garden with the specifically for the purposes of making them into pickles.  They were good but not as crisp as commercial pickles.

My refridgerator pickles stay crunchy but I’m also not processing them in hot water.

This year we are, again, growing cucumbers . . . and we’re getting loads of them.  I wanted to find a recipe for crisp canned pickles.  I found one and with this process the pickles do look less cooked . . . i.e. smooshy . . .  and more like they will have a crunch to them.

This method utilizes a "low temperature process" method . . . the jars stay in the water bath at a lower temperature for a longer time.

To start off with make sure you use fresh, crisp cucumbers.  Don’t can soft or overripe vegetables or you will end up with soft, limp pickles.   Dark green, warty cucumbers are the best and will have fewer seeds.

You’ll need a Quick Process Pickling mix . . .  I use Mrs. Wages Kosher Dill  . . . and clear vinegar.

I generally can pickles in pint jars . . . I prefer wide mouth, but that’s up to you.  Figure it will take about 3 or 4 pickling cucumbers to fill a pint jar. 


Wash the cucumbers in cold water.  Then slice them . . . I cut the small pickles in halves but you can cut them into spears, if you wish.  Makes sure the pickles are a length that leaves at least a half an inch of head space in the jar.

Before you pack the jars you will need to make sure the jars are clean and sanitized.  If you’re dishwasher has a high temperature wash then that is sufficient.  If not submerge the jars in a large pot of water . . . I use my canning pot . . .  and bring it to a boil.  Put the lids in another pot and boil them for several minutes and leave them in the hot water.

Fill the canner about 1/2 full of water and start it heating (with the lid on).

 Follow the directions on the pickle mix . . . basically combine the mix with vinegar (and water if the recipe calls for it).  Bring to a near boil

Pack the raw cucumbers into the jars and pour the simmering pickle mix liquid over them. Fill them to within ¼-inch of the top, seat the lid and hand-tighten the ring around them.   I also shove in a clove of garlic and a sliced jalapeno for extra spice.

Put them in the canner and keep them covered with at least 1 inch of water. Keep the water boiling until you are ready to process. Then, here's the key to crisp pickles: Cucumber pickles should be processed for at 180-185°F, which is obviously below boiling (212 F), but hot enough to kill bacteria. 

Check with a thermometer to be certain that the water temperature remains above 180° during the entire processing time. But keep the temperature below 185° to avoid breaking down the pectin, which will cause softening of the pickle.

Heat them for 30 minutes.

Then carefully remove the jars from the water and allow them to cool in a draft-free area.  I know it’s tempting but don’t touch the jars while they’re cooling and try not to bump or jostle them.  Just let them sit quietly. 

After 24 hours you can remove the rings and make sure your jars have sealed.  But any jars where the lid hasn’t sucked down into the fridge and eat them first.  You can check by pressing your finger into the center of the lid . . . if it pops then it’s not properly sealed.

You can eat the pickles anytime but they’re better if you wait at least 2 weeks.  It’s torture but it’s worth it!

Wednesday, May 2, 2012

Repetitive repetitiousness

Have you ever noticed that when you look at a word for a while it starts to look like it's not right?  It seems as though it can't possibly be spelled correctly. You look it up, speak it out loud . . . in your mind you know it's spelled correctly but it still looks like gobbledygook.  Weird huh?


Well, guess what?  There's a word for that.  It's called 'verbal satiation'.  Ha!  Who knew? 


Verbal satiation is caused by the rapid repetition of a word causes different parts of your brain to fire over and over again which causes 'reactive inhibition' . . . a psychological phenomenon in which repetition causes a word or phrase to temporarily lose meaning . . . meaning . . . meaning . . . meaning . . . meaning.

Wait . . . huh . . . what?  Yeah, just like that.


Rapid repetition causes both the peripheral sensorimotor activity and the central neural activation to fire repeatedly, which is known to cause reactive inhibition; which is to say that repetitive repetition (yeah, I said that) causes a simple decay of functionality within those parts of the brain. 
 
Basically, you're brain gets bored of the stimuli and says I've had enough this crap, can we please move on now?  And that is what makes that word look so freaking bizarre-o even though you know it's right-o.


See?  You're not crazy . . . or are you . . . . . . . . 


Cher’s Spicy Garlicky Refrigerator Pickles

2 Lbs. Cucumbers
2 Jalapeños
Garlic
1 1/4 cups white Distilled Vinegar 
1 3/4 cups water
1 packet (1.94 oz) Mrs. Wages Polish Dill Pickles Refrigerator Mix

(Yield 2 Quarts)

Note that I use regular garden cucumber and not the little pickling cucumbers.  Why?  Because they are cheaper and make good pickles.  A win / win! 

Pick cucumbers that are dark green, firm, and bumpy.  Cukes that  have yellow or white areas in the skin and the warts are almost all gone have more seeds and they make mushy pickles.

Figure 1 or 2 large cucumbers for a quart sized jar.  I use half gallon jars with gaskets and make two batches at a time.  Hubby is a pickle eating machine and we never can have too many. 

Wash and cut the vegetables.  I use one jalapeño for every cucumber and cut it in half.  I cut the cucumbers in half and then half again.  And then crush 2 or 4 or more garlic cloves and remove the skin, leaving them mostly whole.

Pack them into clean jars leaving ½-inch of headspace . . . cucumbers first and stuffing the jalapeños into empty spaces and the garlic on top.

Combine pickle mix, vinegar and water into a large non-reactive pot. Do not use aluminum. Bring mixture just to boil over medium heat, stirring constantly until mixture dissolves.

Evenly divide hot pickling liquid among the packed jars, leaving ½-inch of headspace. If more liquid is needed for proper headspace, add a mix of 1 part vinegar and 2 parts water.

Cool to room temperature, label and store in refrigerator. Product is ready to eat after 24 hours. When properly processed and sealed, unopened refrigerator product can be stored up to 6 months.  See if they last that long!

Wednesday, August 17, 2011

Other things may change us, but we start and end with family


My mom tells a story.  I’m not sure if its funny, sad or shocking.  Maybe it’s a little of each.  I’ll let you decide.

She grew up in the late 40’s and 50’s.  Her home life was very traditional for those times.  Dad worked outside the home.  He was the president of BumbleBee Corpration . . . yeah, the Bubble Bee that makes tuna.  Mom stayed at home doing the homemaker thing.  Both were strict disciplinarians . . . you didn’t mess with my grandpa and grandma. 

As a side note . . . I never knew my grandfather; he died when I was still a baby.  I knew my grandmother.  She died of cancer when I was a young girl and my memories of her are sparse but interesting.  She lived in a dark, cluttered apartment in Washington D.C.; not messy just filled with bric-a-brac and plants.  When we visited her I recall that she always had Clamato juice and vodka in the fridge for her Bloody Mary’s.  She was an alcohol and that was her drink of choice . . . and I seem to recall she was never without a cocktail in her hand.   I always thought she was kind of scary and she wasn’t particularly affectionate.     She reminded me of Joan Crawford in her later years . . . bony and stark looking.   Grandmother never slept on printed sheets because she said they gave her nightmares.  That’s as far as my memories of her go.

Anyhoo . . .

My mom was the youngest with two older brothers (she later had a younger sister but that was after this story).  One summer day, Mom put the boys in charge of their little sister.  Obviously, this was a hassle.    Who wanted to look after a little kid when there was stickball, kick-the-can and tag to play with their friends?  So they came up with a plan that would keep her out of their hair for a while so they could go off and do boy stuff.  They took her to the playground, stripped her nekkid, plopped her on the merry-go-round and set it spinning. 

I don’t know what happened between then and the time Dad got home from work, but as my mom tells it, when he found out what happened SHE was the one who got the beating . . . yeah, those were the days when parents were allowed to discipline their kids without fear of arrest . . . SHE got the beating because she was out in public naked.  The boys?  Well, they were just being boys.


 ________________________


Old Fashioned Sour Pickles


This pickles have an distinct flavor . . . a little bit sweet, a little bit sour, a little bit spicy  . . . a LOT yummy!


Cucumbers

1/2 Gallon Vinegar
1/2 Cup Salt
1 Head Garlic
4 Hot Peppers
1/2 Cup Sugar
1/2 Cup Dry Mustard

Combine dry ingredients and add vinegar. 


Use quart or pint jars that have been washed, scalded and dried. Use small cukes. 


Wash and dry cukes. Pack into jars with garlic and sliced peppers. Fill with vinegar mixture. 


Seal and store in the refrigerator.   Ready to use in about 3 weeks.

Thursday, March 24, 2011

Fake Eggs from China!

Fake Eggs from China! (Shocking - must read)

Beware u guys and gals!

During a recent raid on a wholesale centre in Guangzhou city, the capital of China 's Guangdong province, a large quantity of fake eggs was seized.

Their wholesale price is 0.15 yuan (S$0.03) each - half the price of a real egg.

Consumers have a hard time telling a genuine egg from a fake one. This is good news for unscrupulous entrepreneurs, who are even conducting three-day courses in the production of artificial eggs for less than S$150. A reporter with Hong Kong-based Chinese magazine East Week enrolled in one such course.

To create egg white, the instructor - a woman in her 20s - used assorted ingredients such as gelatin, an unknown powder, benzoic acid, coagulating material and even alum, which is normally used for industrial processes.

For egg yolk, some lemon-yellow colouring powder is mixed to a liquid and the concoction stirred. The liquid is then poured into a round-shaped plastic mould and mixed with so-called 'magic water', which contains calcium chloride.

This gives the 'yolk' a thin outer membrane, firming it up. The egg is then shaped with a mould. The shell is not forgotten. Paraffin wax and an unidentified white liquid are poured onto the fake egg, which is then left to dry.

The artificial egg can be fried sunny-side up or steamed. Although bubbles appear on the white of the egg, those who have tasted it say the fake stuff tastes very much like the real thing.

But experts warn of the danger of eating fake eggs. Not only do they not contain any nutrients, a Hong Kong Chinese University professor warned that long-term consumption of alum could cause dementia


To make the egg white, various ingredients, including a powder and alum, are mixed together.


The 'yolk' is shaped in the round mould. 'Magic water' containing calcium chloride is used.


Hardy shells are formed by pouring paraffin wax and a liquid onto the egg, which are then left to dry. 


If you're like me you like a pinch of salt on your eggs . . . I'm pretty sure that's how you should take this story.  


This story has been floating around the interwebs for years; often touted as factual.   However, it seems unlikely to me for a number of reasons.  The first being that what could be easier and cheaper than a chicken popping out an egg?  Why would anyone go through the effort of manufacturing something that requires none at all?


Secondly, it would seem to me that making an egg would not only be time consuming but the cost of the materials would make the fake eggs prohibitively expensive in comparison to real eggs.  


Lastly, the fake eggs are a purely chemical concoction.  I can't imagine how they could possible taste like the real thing.


Why would someone endeavor to do this?  I guess because they can . . . some people have way too much time on their hands.


______________________


I have friends that have a brood of laying hens.  They sell the eggs but often have way more eggs on hand than they can possible sell.  I hate to see their wonderful eggs go to waste . . . because fresh is so much better than store bought . . . so it got me thinking about find out the best way to preserve fresh eggs.    I found a couple time tested methods that have been in use since before refrigeration was available and are still in use in some Amish communities.


First and foremost . . . . these methods will only work for FRESH eggs.  It will not work for processed grocery store eggs.

If found this method here . . .

Store the eggs in a finely ground preservative such as salt, bran, or an equal mix of finely ground charcoal and dry bran or finely ground oats. 
Store the eggs layer upon layer, so long as you they don’t touch each other, metal, or wood.  Be sure you have enough finely ground preservative to pack them in.  (The salt and bran can be used for animal feed later)
Store the eggs small side down.  This allows the yolk to settle into the egg white which has antibacterial properties.
Store the eggs in a covered container and keep in a cool, dry place – do not expose the eggs to extreme heat or cold.
Eggs will keep “fresh” for up to 9 months.  In fact, some countries are known to have stored their eggs like this for up to 2 years. 


According to this source, the “water glass” method gives the best and most dependable results for preserving eggs.  “Water Glass” or “liquid glass” is sodium silicate and is the generic name for sodium metasilicate.  Water glass is not as common as it used to be and may difficult or expensive to obtain.  See recipe below to make your own. 

Make sure the eggs have no cracks or imperfections. One cracked egg will spoil the entire crock of eggs.


Water Glassing Eggs

Water glass needs to be diluted. I use the 11 to 1 ratio recipe – or 11 parts water to 1 part water glass (sodium silicate). For about 16 eggs you will need 1 quart of water to 1/3 cup of water glass.

The water should be measured out, boiled and then allowed to cool completely.

Sterilize a clean ceramic crock, plastic bucket, wooden keg or other container with boiling water.  Avoid using metal containers.

Pour the cooled water into the crock and then add the water glass and stir well.

Place the fresh eggs pointed side down into the crock.

You can fit many eggs into a crock and eggs can be stacked on top of one another until the crock is filled. Make sure that at least 2″ to 3″ of liquid covers the eggs at all times and the crock also should be covered.

The best success is obtained when the crock is stored in a cool dry location.

When the eggs are needed for cooking remove them from the crock and wash them and then break them into a separate bowl to check the quality by smell and visual examination.  You may note that the viscosity of the egg white will have changed but the flavor is still good and acceptable for general cooking purposes. Sometimes the yolk will take on a very dark orange red color but it is harmless.
When boiling eggs that have been water glassed you will need to prick the eggshell with a pin. Because the eggshell is no longer porous the steam will build up inside the egg while it is boiling and explode.

Fresh, unwashed eggs kept in a solution of water glass will remain good and usable for 6 to 9 months when properly collected and stored.

____________________


You can prepare sodium silicate or water glass from gel beads (silica) and lye (sodium hydroxide).

All you need to make a sodium silicate solution are water, silica, and sodium hydroxide. Silica comes in those little packets labeled 'do not eat' with electronics, shoes, etc.

2 Teaspoon silica gel beads (crushed)
1-1/2 Teaspoon
1/2 cup water

Wear proper safety gear, which includes gloves and eye protection
Slowly pour lye into water.
Once the lye is dissolved, slowly add the 6 grams of crushed silica gel beads.

_________________


I haven’t tried either method but I’m interested in attempting the water glass method and making my own solution.  Future blog post!!

Pickling eggs is another good method but they must be refrigerated.  


_________________


Basic Pickled Eggs (Recipe for One Quart)


12 Extra Large Eggs

1 1/2 Cups Distilled White Vinegar

1 1/2 Cups Water
¾ Teaspoon Dill Seed
¼ Teaspoon White Pepper

3 Teaspoons Salt
1 Clove Garlic, Crushed

Place eggs in a medium saucepan and cover with cold water. Bring water to a boil and immediately remove from heat. Cover and let eggs stand in hot water for 10 to 12 minutes. 


Remove from hot water, cool and peel.

In a medium saucepan over medium heat, mix together the vinegar, water and pickling spice. Bring to a boil and mix in the garlic and bay leaf. Remove from heat.

Transfer the eggs to sterile container. Fill the containers with the hot vinegar mixture, seal and refrigerate 8 to 10 days before serving.


These were sooooo good!  The best pickled eggs I've ever tasted with a nice texture and amazing garlic/dill flavor.  NOM!


All of the eggs I used in this recipe were courtesy of my good friends Stephanie and Phil.  

If you live in or near Connecticut and want farm fresh eggs, contact Stephanie for pricing and availability.