Showing posts with label Recipes. Show all posts

Tuesday, October 18, 2011

As a child my family's menu consisted of two choices: take it or leave it.


Polenta is an ancient food, predating even bread.   It is easy, inexpensive and versatile. 
 Originating as a humble peasant dish, polenta began as nothing more than porridge of wheat or bean flour and water. Since the introduction of maize to Europe, the primary ingredient is now corn.  Its modest beginnings as merely a stop gap to starvation have evolved into the classic comfort food it is today.
 Polenta can be served in place of bread with butter and cheese, as a side dish to a meat dish, or as a main dish replacement for pasta.  It’s excellent as a leftover when it’s fried in butter and smothered in cheese. 
Polenta went from a lowly dish of the poor to an important staple. Its simplicity, texture and flavor make it a favorite of mine . . . one that I don’t make often enough.


Easy Polenta with Sausage & Tomato Sauce 

2 Cups Milk

2 Cups Chicken Stock
1 Cup Yellow Cornmeal
1 Cup Parmesan Cheese
2 Cups Spaghetti Sauce 
1lb Sausage Meat, Browned
1 Cup Mozzarella Cheese


Preheat the oven to 350 degrees F (175 degrees C). Grease a 9 inch square baking dish.


In a large pot, combine the milk and chicken stock. Bring to a boil over medium-high heat. When it is at a rolling boil, gradually whisk in the cornmeal, making sure there are no lumps. Reduce heat to low and simmer, stirring constantly until thick, about 5 minutes. Remove from the heat and stir in the Parmesan cheese.


Pour the polenta into the prepared baking dish.  Top with sausage, spread spaghetti sauce and add cheese.


Bake for 15 minutes in the preheated oven, or until sauce is bubbling.


Note:  Although it tasted good, I don't think mine came out right.  It's supposed to be a firm texture, mine was kind of mushy.  I'm not sure what I did wrong.


Thursday, October 6, 2011

Like white on rice


Honky . . . a favorite word used by George Jefferson in the 70’s sitcom.  Mr. Jefferson was moving on up to the east side; to a de-luxe apartment in the sky who finally got a piece of the pie.

Honky . . . a word used by blacks to refer to whites.  It’s not particularly harsh sounding considering it’s a racial slur . . . it’s actually a funny word. 

The origin of this word could be a twist on words from the native language of two distinct groups . . . one from immigrants, the other from slaves.

Honky may be a variation of hunky, which was a variant of Bohunk, This was a derogatory term for Bohemian, Hungarian, and Polish immigrants that in the early 1900’s.  According to a couple of sources, black factory workers picked up the term from white workers and began applying it indiscriminately to all white folks and it caught on.

Honky may also have derived from the African term "xonq nopp" (the ‘x’ is pronounced as an ‘h’) which literally means "white person". The term may have originated with Wolof-speaking slaves brought to the US.


Maybe because it’s more colorful, I’m going with that the word honky dates back to the 1920’s.  Supposedly, the word came about because of the practice of white men who would venture into the red light districts seeking to pick of African-American prostitutes.  Those parts of town weren’t necessarily the best of areas. So the theory is that the curb-crawlers were afraid to stop their cars and would honk their car horns to draw the hookers to them.  Eventually, black people started to call the johns “honkies” and it became a part of the common vernacular.


Wednesday, October 5, 2011

It takes a woman twenty years to make a man of her son, and another woman twenty minutes to make a fool of him

Maybe I’m too judgmental or narrow-minded, but I think that it’s rather unmanly for a guy to sit with his legs crossed.  I'm not talking about the perpendicular cross with foot resting on his knee . . . but like a girl.


I’m not saying it’s effeminate, just less than masculine. 


I don’t understand how it could be comfortable for a guy anyway . . . I’m a girl and I don’t think it’s all that comfy and I don’t have doodads, dingleberries and  . . . uh . . . stuff that could get smooshed.


So, maybe I think it’s unmanly because any man with a substantial . . . er . . . package wouldn’t be able to sit that way.


Not that I’m saying size matters.  No, I’m not saying that at all.  Just sayin’.


Tuesday, October 4, 2011

Schlemiel! Schlimazel! Hasenpfeffer Incorporated!


1, 2, 3, 4, 5, 6, 7, 8 Schlemiel! Schlimazel! Hasenpfeffer Incorporated!

If your old like me then you may recall that little chant from the opening sequence of the Laverne and Shirley show . . . actually I’m not dating myself all that much since I only caught the show in syndication.  So, nuts to you!


The little ditty is a Yiddish-American hopscotch chant.  Okay, that clears that up but what is a schlemiel and, for the love of Pete, what in the heck is a Schlimazel??

A schlimazel is the guy who walks past a second floor window-ledge and knocks the flower pot off . . . a schlemiel is the guy walking underneath.

A schlemiel is a klutz . . . an awkward person.  A schlimazel is a born loser.   It’s kind of a commentary of the type of people that Laverne and Shirley were I guess because they were always finding themselves in sticky situations and pretty much always down on their luck.  Like Lavern and Shirly . . . you can’t have a schlemiel without a schlimazel . . . they go together. 


Kind of like  ramma lamma lamma ka dinga da dinga dong.  Something like that, anyway.


Monday, October 3, 2011

Oompa Loompa Doompadee Doo


I have a friend who told me that she was on this kick when all that she was eating was carrots . . . bags and bags of those little baby carrots.  She ate so many over a period of a few weeks that she actually turned orange.

She must have looked like an Oompa Loompa with a glandular problem . . . my friend is pretty tall.

Is it really possible that eating too many carrots can cause your skin to turn orange-ish?  Yeah, actually it is.

It’s a condition called carotenosis . . . it is caused by eating a lot of foods that contain carotene . . . a red or yellow hydrocarbon pigment . . .  egg yolks, sweet potatoes, beets, a variety of leafy vegetables and, of course, carrots. Carotene builds up in your bloodstream and most people turn a sickly yellow color resembling jaundice. It’s rarely fatal . . . apparently you have to try really, really hard to die of carotenosis.

The good news is you just have to stop eating carrots to resume your normal hue.


Thursday, September 8, 2011

Balls to the wall

Balls to the Wall is an expression that refers to an all-out effort . . . giving it all you’ve got.


The origin of this idiom . . . like many . . . is debatable.  However, the most widely accepted explanation is based in aviation.  On airplanes, the throttle control handles  . . . or joystick . . . and the fuel mixture are often topped with grips that are ball shaped.  When a pilot pushes the ball into the full thrust position . . . towards the firewall . . .  it pushes the aircraft to go as fast as possible.

On a side-note, if you've ever wondered why a joy stick is called thusly . . . well, chances are that is indeedy a vulgar term . . . the obvious implication that a (male) pilot was gripping the stick between his legs; his joystick.

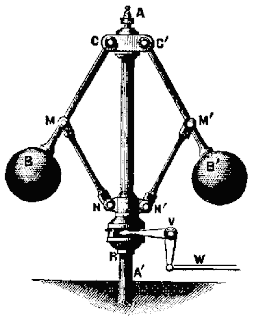
Another explanation involves steam engines.  These engines have a mechanical regulator that utilize of a pair of hinged lever arms with a ball on the end of each arm.  As the engine speeds up, centrifugal force causes the arms to rise up closing a valve.  The regulator can be adjusted so that the arms go to horizontal (with the balls pointing to the wall) without closing the valve.  This adjustment does not limit the speed of the engine so that it can go full force.

A similar explanation refers the automatic speed control for a diesel-generator . . . like those used on submarines.  Inside the hydraulic governor round counterweights are attached to a vertical drive shaft. The weights (balls) are on hinged arms. As the engine spins, the drive shaft spins and slings the balls outward toward the walls of the governor housing. The faster the engine turns, the closer the balls get to the wall, i.e., engine at high speed, balls to the wall.


Wednesday, September 7, 2011

Peter Piper Picked a Peck of Pickled Peppers


Peter Piper picked a peck of pickled peppers;
A peck of pickled peppers Peter Piper picked;
If Peter Piper picked a peck of pickled peppers,
Where's the peck of pickled peppers Peter Piper picked?

Who is Peter Piper?  Why, he’s a fellow named Peter who blows a pipe and picks peppers . . . duh!

But more importantly, what in the heck is a peck??  A peck is a measurement unit of dry measure . . . it is equal to 2 gallons or 8 dry quarts or 16 dry pints. That’s a lot of peppers!  But it doesn’t turn out to be a whole peck  . . . er . . . heck of a lot when you pickle them.

If you’ve gotten a garden and your peppers are popping you should want a way to preserve them.  There are a number of different ways to do this.  Last year I dried most of my peppers with excellent results . . . I’m still using them in any number of recipes calling for pepper flakes. 

But, this year I decided to try something different . . . taking a cue from Peter Piper I opted to pickle and can them.

To Make Homemade Pickled Peppers you can use just about any kind of pepper . . . hot or sweet . . . including Chilies, Pimiento, Hungarian, Banana, Jalapeno, Etc.

If stored properly, canned pickled peppers have a shelf life of about 12 months.  That is they should be kept in a cool, dark place

For 9 pints you will need about 7 lbs of peppers total.  You can mix and match varieties, hot and sweet . . . whatever you want.

You will also need:

Jar grabber (to pick up the hot jars)
Jar funnel
Large spoons and ladles
At least 1 large pot
One 6 - 8 quart pot or saucepan
Pint Sized Ball jars
1 Canner or a huge pot


It’s very important that you select peppers that are very fresh and crisp.  Limp, old peppers will make nasty tasting canned peppers. 

Hot pepper caution: Wear plastic or rubber gloves and do not touch your face while handling or cutting hot peppers. If you do not wear gloves, wash hands thoroughly with soap and water before touching your face or eyes . . . or your private parts.  Ouchie!!


Wash the jars and lids.  The dishwasher is fine for the jars.  I put the lids in a small pot of almost boiling water for 5 minutes, and use the magnetic "lid lifter wand to pull them out.

Get a large pot of water boiling.  This is for the hot water bath that you will be processing the peppers in.

Wash the peppers to remove any dirt and debris.  You can remove the seeds if you want to, at this point.  I like to keep my hot peppers whole for the fullest heat. 


Blister the peppers by placing them in a hot oven set at 400º for 6 to 8 minutes; using tongs carefully turn pepper often until skin blisters evenly on all sides.  Then place them in a bowl covered with a towel until you’re ready to use them.

Next you want to prepare your pickling solution.  In a saucepan, combine and heat:

5 cups vinegar (5%)
1 cup water
4 tsp canning or pickling salt
2 tbsp sugar
2 cloves garlic

Heat it to boiling and simmer for 10 minutes. Then remove the garlic (and discard).

Pack the jars with the pickles and pour the vinegar solution into each packed jar.  Fill jars, leaving 1/2-inch of headspace. Flatten whole peppers. You may add 1/2 teaspoon of salt to each pint jar, if desired for taste (it is not a preservative).

Put the lids on each jar and seal them by putting a ring on and screwing it down snugly (but not with all your might, just "snug").

Put the jars in the canner and keep them covered with at least 1 inch of water. Keep the water boiling. Boil them for 10 minutes.  Remember to adjust for altitudes . . .

The normal boiling point of water at sea level is 212°. At higher altitudes, water boils at lower temperatures. When processing jars of jams, pickles, and other preserves in a boiling water bath at higher altitudes, use the following chart to adjust times.

1,001 feet to 3,000 feet, add 5 minutes to processing times.
3,001 feet to 6,000 feet, add 10 minutes to processing times.
6,001 feet to 8,000 feet, add 15 minutes to processing times.
8,001 feet to 10,000 feet, add 20 minutes to processing times.


Lift the jars out of the water and let them cool on a wooden cutting board or a towel, without touching or bumping them in a draft-free place (usually takes overnight), where they won't be bumped. You can then remove the rings if you like. Once the jars are cool, you can check that they are sealed verifying that the lid has been sucked down. Just press in the center, gently, with your finger. If it pops up and down (often making a popping sound), it is not sealed. If you put the jar in the refrigerator right away, you can still use it.


Thursday, September 1, 2011

A man taking basil from a woman will love her always


If you’re familiar with making pesto you probably use a food processor or blender to mix all the ingredients.  While being tasty, the authentic Italian method imparts more flavor by allowing the individual tastes to come through.

I made this recipe and thought it was delish . . . hubby didn’t like it and said it tasted “too strong”.  That being said, he’s never had pesto before.  It tasted like pesto is supposed to taste . . . only more so!  Yummers.

Chopping all the ingredients by hand is the key because this prevents the ingredients from becoming a completely homogenized emulsion or paste. You will need a good sharp knife and the chopping process will take about 20 minutes. 

The technique is to chop a bit, add some ingredients, chop some more. This helps to create a variance of cut sizes throughout the pesto contributing to the overall texture.

1 Large Bunch of Basil, Leaves Only, Washed And Dried
3 Medium Cloves of Garlic
1 Small Handful of Raw Pine Nuts
1 Cup Parmesan, Loosely Packed And Freshly Grated
A Few Tablespoons of Extra-Virgin Olive Oil

Start chopping the garlic along with about 1/3 of the basil leaves.

Once this is loosely chopped add more basil, chop some more, add the rest of the basil, chop some more . . . scrape and chop, gather and chop.

At this point the basil and garlic should be a very fine mince.

Add about half the pine nuts, chop. Add the rest of the pine nuts, chop.

Add half of the Parmesan, chop. Add the rest of the Parmesan, and chop.

In the end you want a chop so fine that you can press all the ingredients into a basil "cake".  Transfer the pesto "cake" to a small bowl (not much bigger than the cake). Cover with a few tablespoons of olive oil.

You can set this aside or place it in the refrigerator until you are ready to use it.

Just before serving give the pesto a quick stir to incorporate some of the oil into the basil. You can thin the pesto with a splash of pasta water for more coverage. 

I served mine with a hearty gnocchi  . . . with a side of bruschetta . . .  it was awesome.

Makes about 1 cup.