 In my vegetable garden I always sow basil seeds with the tomatoes.
Let's face it . . . tomato and basil are perfect together.
Throughout the summer I pick basil here and there for recipes and
whatnot. But now that summer is over and my garden is pretty much played
out I have huge bunches of basil that I need to do something with lest they go
to waste.
If you're planning on drying your basil keep in mind that basil
begins to lose flavor once it starts flowering, so plan on harvesting it before
it begins flowering.
Dried basil is less full-bodied when it is dried, but it doesn't
lose its distinctive delicious taste. Keeping the dried leaves whole
instead of crushing them retains more of the flavor.
Drying basil . . . herbs in general . . . is easy. All it
requires is a little time . . . . or a lot of time depending on the drying
method employed.
Whichever method you use you must start by washing the
basil. Place each branch under the tap.
The water should be about room temperature. Carefully wash off the
dirt and debris from the leaves. Then blot the leaves dry with paper towels. While you’re
washing the leaves discard any that are rotten or look bad.
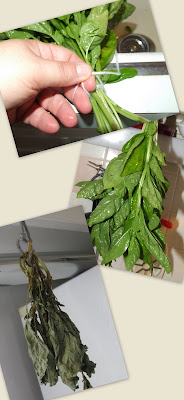
Air drying is the easiest method as it doesn't require any special
equipment. Select stalks that are fairly even in length. Hold the
stalks upside down then take string or a rubber band or a twist tie and tie the
base of the stems together . . . kind of like a bouquet.
Hang the basil in an area where it can dry. You want to select an
area that has good air circulation to prevent mold from growing.
Depending on conditions, it will take two or three weeks for the leaves
to completely dry out. The leaves will be brown and crunchy when they are
totally dry . . . if they are soft then they are not yet dry.
I prefer to use my dehydrator. It's faster and there's
little chance that the leaves will mold or be otherwise contaminated.
Remove the cleaned leaves from the stalks. Place the basil
leaves on the drying racks, leaving space between them for the air to
circulate, and only one leaf thick on each rack.
Set the dehydrator thermostat set to 95°F to 115°F. If
the ambient humidity is high you can set it as high as 125°F.
I started mine out at 95°F and after several hours they were barely
drying so I bumped it up to 125°F and they dried out within a couple of
hours . . . it was a fairly humid day and we don't have air conditioning.
Overall mine took about 10 hours to dry but that time could have been
drastically reduced if I had started out with a higher temperature. Use
your best judgment.
Once the leaves are dry you can either keep the leaves whole or
crunch them up. Simply pick them off the stalks (crush them or not) and
then place them in an airtight jar or zipper bag.
Store herbs in a cool, dry, dark place (away from sunlight). Dried
herbs keep for years but for best results use within a year. Most herbs will
diminish in flavor with age and a larger amount will be needed to achieve the
desired flavor in cooking


No comments:
Post a Comment